![]() Now that you know how your camera, any camera, works, let’s get into the nitty gritty of the The Exposure Triangle.
Now that you know how your camera, any camera, works, let’s get into the nitty gritty of the The Exposure Triangle.
Shutter Speed
NOTE: Even if you don’t have a physical shutter in your camera (smartphone, action camera, drone and mirrorless owners), this information is vital for taking great photos.
Shutter Speed affects blur. Get that into your noggin right now.

It does some other things, of course, but the biggest effect it has on the average photo is stopping motion, or not stopping motion, depending on how it is used. Motion can be in front of the camera or the camera itself moving. Of course, blur will occur if things aren’t in focus, but let’s assume everything is in focus.
Shutter Speed is the speed at which the shutter inside your DSLR (not smartphones, drones, mirrorless or action cameras as they scan of the sensor from top to bottom instead, which functions the same, essentially) opens and closes to let in light. That amount of time is expressed as, well, time. 1″ is one second of open shutter. 5″ is five seconds of open shutter. 1/60 is one sixtieth of a second of open shutter.
I know some of you out there hate math, but it will come into play regardless. Here’s one example. Which let’s in more light, 1/10 or 1/100?
Answer: 1/10. Remember: Larger denominator (that number on the bottom of the 1/ fraction) = less light = faster shutter speed. 1/10 lets in more light that 1/100 than 1/1000. There’s a diagram at the bottom to help with this memorization.
I know that is over simple for those that enjoyed or at least ‘got’ math, but I have taught this enough to know many out there outright hate math.
The Physical Shutter Inside Your Camera
So where the heck is this shutter and just how does it work? Let’s look at, what is loosely called, a diagram of a camera:
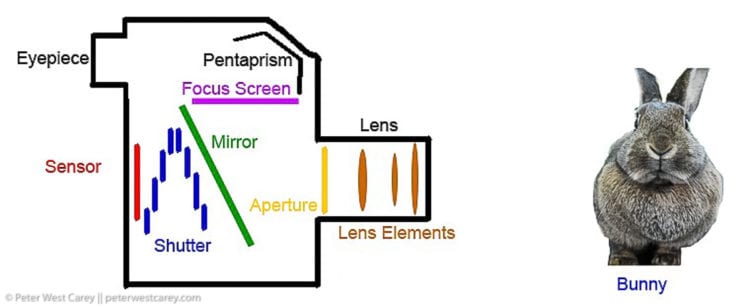 When the camera shutter release (aka: The Button) is not pressed, this is how DSLR camera stays. Light comes in through the lens, is focused, passes through the aperture, bounces off the mirror, bounces twice off the pentaprism and then through the eyepiece so you can see it. Do you notice the shutter is in a bunch of pieces? This is to represent the two curtains of the shutter; front and back. I used four pieces but yours might have more or less. For the curious, here’s a picture looking in through the front of my camera.
 That bright thing at the top is my thumb holding the mirror up and out of the way. What you are looking at is the front curtain of the shutter. Notice the individual blades (four of them). Behind this curtain is an identical curtain. When you press the shutter release all hell breaks loose.
The mirror flips up out of the way (without the aid of my thumb). While it is doing that, the shutter curtains performs a little dance that looks like this:
 That’s how the shutter functions. When things get going reall fast, the second curtain follows the first curtain, only letting in a smidge of light to expose the sensor for the set time, such as 1/200th of a second. Like so:
 The faster the shutter speed, the more action in front of the camera is stopped. The slower the shutter speed, the more things in front of the camera can blur. To break blur down a bit further, let’s think about how you see things.
How You See Things
You see things because light bounces off of them and hits your eye (please don’t make me draw an eye…..you won’t like it, but it is a lot like a camera). You aren’t seeing the bunny, per se, you are seeing the light bouncing off of it. This plays into White Balance, covered later.
Blur is represented in the camera when light bounces off of an object and, because of a slow shutter speed where light is allowed to hit the sensor for (relatively) long periods of time, hits the sensor in two or more spots. (Again, I’m only talking about movement blur, not out-of-focus blur.) If that shutter is left open for, say, one second as in the first shutter diagram, the bunny can move a lot and light will bounce off of it and hit different parts of the sensor. Multiple images so close that sharp edges look blurred.
Here’s an example of moving the camera with the shutter open for 1.6 seconds.
 Now this isn’t necessarily bad. It can be used for some cool effects and we’ll cover Pan Blur, Light Trails and long exposures with flash later on in the month.
For instance, hold the camera steady (or use a tripod) and let the action move for five seconds, like this scene from Cusco, Peru, and you get some interesting light trails.
 Does This Make Sense?

Moving objects need a faster shutter speed (1/1000 is faster than 1/60 is faster than 1″) to be able to make them appear sharp and not blurred. This is also true of you, the camera holder, moving. If you aren’t still and you move the camera while shooting and the shutter speed is slow, say 1/10, then things will blur. We’ll go over How To Hold A Camera later as well.
Nice, crisp stopped action:


An important thing to know about shutter speed is it is linear in the amount of light hitting the sensor. Meaning 1″ is twice as fast as 2″. 1 is half of 2. 1″ lets in half as much light as 2″. 1/2″ lets in half as much light as 1″. 1/4″ lets in half as much light as 1/2″. 1/8″ lets in half as much light as 1/4″. 1/15 (there is some rounding in cameras these days) lets in half as much light as 1/8″. 1/30, 1/60, 1/125, 1/250, 1/500, 1/1000, 1/2000, 1/4000 to the highest most cameras will go of 1/8000.
Stop Now, Wait A Minute
Each of these halvings of light (or doubling of light if you go the other way on the scale) is called a stop. A stop is a very important concept and it will come up again and again.
In this case, going from 1″ to 1/4″ is two stops less light. That is, 1″ to 1/2″ was half as much light (1 stop) and 1/2″ to 1/4″ was half again as much (1 stop) = 2 stops. Those good with math can just divide or multiply the fractions by 2 for each stop of light.
Pop Quiz: How many stops less light is there between 1/60 and 1/1000? Use the scale above to help. I’ll reveal the answer tomorrow.
Now then, before we wrap this up, below is a piece of a puzzle which will be revealed next week. It’s meant as a quick reference and helps some people remember their shutter speeds and what they do. The arrow represents more light hitting the sensor down to less light hitting the sensor.
 If you want to take pictures of slugs, you can get by with slower shutter speeds. If you want to take pictures of bunnies on scooters, you’ll need faster shutter speeds. The word Blurry is to indicate if you are hand holding a camera, or if there is movement in front of the camera, your photo is likely to be blurrier at the top of the scale. Of course, this scale extends past both 1″ and 1/250
Wrapping It Up
I hope you have enjoyed this first week of posts. On Monday we’ll start up again with What is an Aperture?
Until then, I have a Weekend Experiment for you to try. These experiments are changes to go out and practice and learn firsthand. The first experiment is about Speed & Light. Give it a try and post your results.
Questions? Pop ’em like Pez in the comments section below. or email me at peter@peterwestcarey.com.
 Photography Basics – A 43 Day Adventure, and its companion 40 Photography Experiments, are series written by professional photographer Peter West Carey. The series are designed to unravel the mysteries of photography, helping you can take better pictures. Subscribe here to receive all the updates and bonus material. Your comments are always welcome.
![]() If you enjoy the series, consider learning photography first-hand on a professionally led international photo tour in Nepal or Bhutan. More information can be found at Far Horizon Photo Tours.
If you enjoy the series, consider learning photography first-hand on a professionally led international photo tour in Nepal or Bhutan. More information can be found at Far Horizon Photo Tours.